How to Clean a Fuel Tank Out A UK Driver's Guide
- Misfuelled Car Fixer

- Jan 10
- 16 min read
Cleaning a fuel tank isn't just a simple drain and refill. It's a meticulous process of getting rid of old, contaminated fuel, physically clearing out any gunk and debris from inside, and flushing the whole system before introducing fresh, clean fuel.
This is a job you'll face if you've accidentally put the wrong fuel in, if the car has been sitting idle for ages, or if you suspect water has found its way into the tank. Given how flammable petrol and diesel are, this is a task where you absolutely cannot cut corners on safety.
Why a Clean Fuel Tank Is Critical for Your Car
It helps to think of your fuel tank as the very first link in your engine’s lifeline. When it’s clean, your engine gets a pure, steady supply of fuel, letting it run just as the manufacturer intended. The moment contaminants get in, however, a chain reaction starts that often ends with an unexpected breakdown.
The signs can be subtle at first. You might notice the car hesitating when you accelerate, or it might struggle to turn over on a cold morning. These aren't just minor annoyances; they're often the first red flags that your fuel system is in trouble. Nasty stuff like water, rust, or sludge is being sucked from the bottom of the tank and sent directly towards your engine.
Common Scenarios Leading to Contamination
It’s usually everyday situations that cause the biggest headaches. A classic car left in the garage over winter can accumulate a thick, jelly-like sludge as the fuel breaks down. Condensation inside a half-empty tank can introduce water, which sinks to the bottom and becomes a breeding ground for microbial growth, often called "diesel bugs."
Then there’s the simple, all-too-common mistake at the pump. The RAC estimates that misfuelling happens around 150,000 times a year in the UK alone. A surprising number of these incidents occur at busy service stations in commuter hubs like Suffolk. You can read more about how tank cleaning services are adapting to these challenges across the UK.
A contaminated fuel tank is a ticking time bomb for your engine. Sludge, water, and debris can clog filters and injectors, leading to costly repairs and leaving you stranded without warning.
The Impact on Your Vehicle's Performance
Once dirty fuel gets into the system, it really starts to cause damage. Components like the fuel tank strainer are designed to filter out impurities, but they can only do so much. When this first line of defence is overwhelmed, things go downhill fast:
Clogged Fuel Filters: Gummy sludge and rust particles will quickly block the fuel filter, effectively starving the engine of the fuel it desperately needs.
Damaged Injectors: Even tiny particles can score and damage the delicate, high-precision fuel injectors. This leads to poor fuel spray, a drop in power, and higher emissions.
Loss of Engine Power: With a restricted fuel supply, the engine simply can't produce its full power, making the car feel sluggish and unresponsive.
While tackling a fuel tank clean-out yourself might seem like a way to save money, the risks of handling highly flammable liquids and hazardous waste are very real. This guide is built around a safety-first approach, helping you understand what’s involved so you can decide whether to proceed yourself or call in professionals like Misfuelled Car Fixer for a guaranteed safe and effective job.
Getting Your Gear and Workspace Right: Safety First
Before you even think about touching the fuel tank, let's get one thing straight. This isn't like topping up your windscreen washer fluid. Handling petrol and diesel is serious business. The flammability and the fumes are no joke, so setting up a safe workspace and wearing the right protective gear isn't optional—it's absolutely critical.
Fuel vapour is a sneaky thing. It’s heavier than air, so it creeps along the ground and can find an ignition source you haven't even thought of. We're talking about anything from a boiler's pilot light in a nearby utility room to a stray spark from dropping a metal tool. This is precisely why professionals like us use specialised, ATEX-rated (Atmospheres Explosibles) equipment—it’s designed from the ground up to be spark-proof.
Your Personal Safety Kit
First things first, let's get your gear sorted. Each piece has a vital job to do, and cutting corners here is a recipe for disaster.
Here’s what you absolutely must have:
Chemical-Resistant Gloves: Forget standard latex gloves; they’ll fall apart. You need proper nitrile gloves, as they're built to stand up to petrol and diesel without degrading.
Safety Goggles: A splash of fuel in the eye is incredibly painful and can cause serious damage. Don't rely on your everyday glasses. Get a pair of proper, wrap-around safety goggles that shield your eyes from all angles.
Respirator Mask: Breathing in fuel fumes will leave you feeling dizzy and sick, and it can cause long-term health problems. A respirator fitted with organic vapour cartridges is a must-have, especially if the job takes a while.
The risk of splashes is real when you’re working with fuel, so understanding the specifics of eye protection is a good idea. You can learn more about choosing the right safety glasses to ensure you're properly protected. Think of this gear as the only thing standing between you and a trip to A&E.
Setting Up a Safe Work Zone
Where you do the job is just as important as the gear you wear. A cramped, closed garage is probably the most dangerous place you could choose. It doesn't take long for vapours to build up to explosive levels.
Crucial Safety Warning: Never, ever work inside a domestic garage or any other enclosed space. You need to be outdoors in a well-ventilated spot, like a driveway, well away from buildings and any potential sources of ignition.
Before starting, a few non-negotiable prep steps are in order. The absolute first thing you must do is disconnect the car's battery. This eliminates the primary source of electrical sparks. Unbolt the negative terminal and tuck it safely away from the battery post so there's zero chance of it reconnecting.
Below is a quick checklist of the essentials. Going through these steps isn't just about ticking boxes; it's about creating a controlled environment where you can work safely.
Essential Safety Checklist Before You Begin
Safety Action / Equipment | Reason | Professional Standard |
|---|---|---|
Well-Ventilated Outdoor Area | Prevents the build-up of explosive fuel vapours. | Work is always performed in an open or force-ventilated space. |
Disconnect Car Battery | Eliminates the primary source of electrical sparks. | This is the first action taken on any fuel system job, without exception. |
Class B Fire Extinguisher | Specifically designed to tackle flammable liquid fires (petrol, diesel). | A serviced and certified Class B extinguisher is always on hand. |
Nitrile Gloves | Protects skin from chemical burns and absorption. | Fuel-resistant gloves are standard-issue PPE. |
Wrap-Around Safety Goggles | Prevents fuel splashes from causing severe eye injury. | Mandatory eye protection is worn at all times. |
Organic Vapour Respirator | Protects lungs from harmful and toxic fumes. | Respiratory protection is used, especially for prolonged exposure. |
Spill Kit (Sand/Cat Litter) | Quickly contains and absorbs accidental spills. | Professional spill kits are kept within the work area. |
No Ignition Sources Nearby | Removes risk from cigarettes, pilot lights, heaters, etc. | A full 360-degree check for ignition sources is performed. |
Once you’ve got these sorted, you’re in a much better position. Have a Class B fire extinguisher within easy reach, and make sure you know how to operate it before you need it. A bucket of sand or cat litter is also a great idea for quickly soaking up any spills.
For a deeper dive into the draining process itself, our post on safe and simple steps to empty a fuel tank offers more detailed guidance. Taking a few extra minutes on preparation can make all the difference.
A Practical Guide to Draining and Cleaning the Tank
Right, with your safety gear sorted and the car prepped, it's time to get down to the business of draining and cleaning the tank. This isn't a job you rush. It’s a methodical process that requires patience, a steady hand, and a healthy respect for what you're working with.
The aim here is simple: get all the bad fuel out and then physically clean the gunk from the inside of the tank. Whether you've just put the wrong fuel in or you're dealing with years of accumulated sludge, the basic principles don't change.
Before you even think about touching the fuel, you need to lock in your safety process. We've simplified it into three crucial actions.
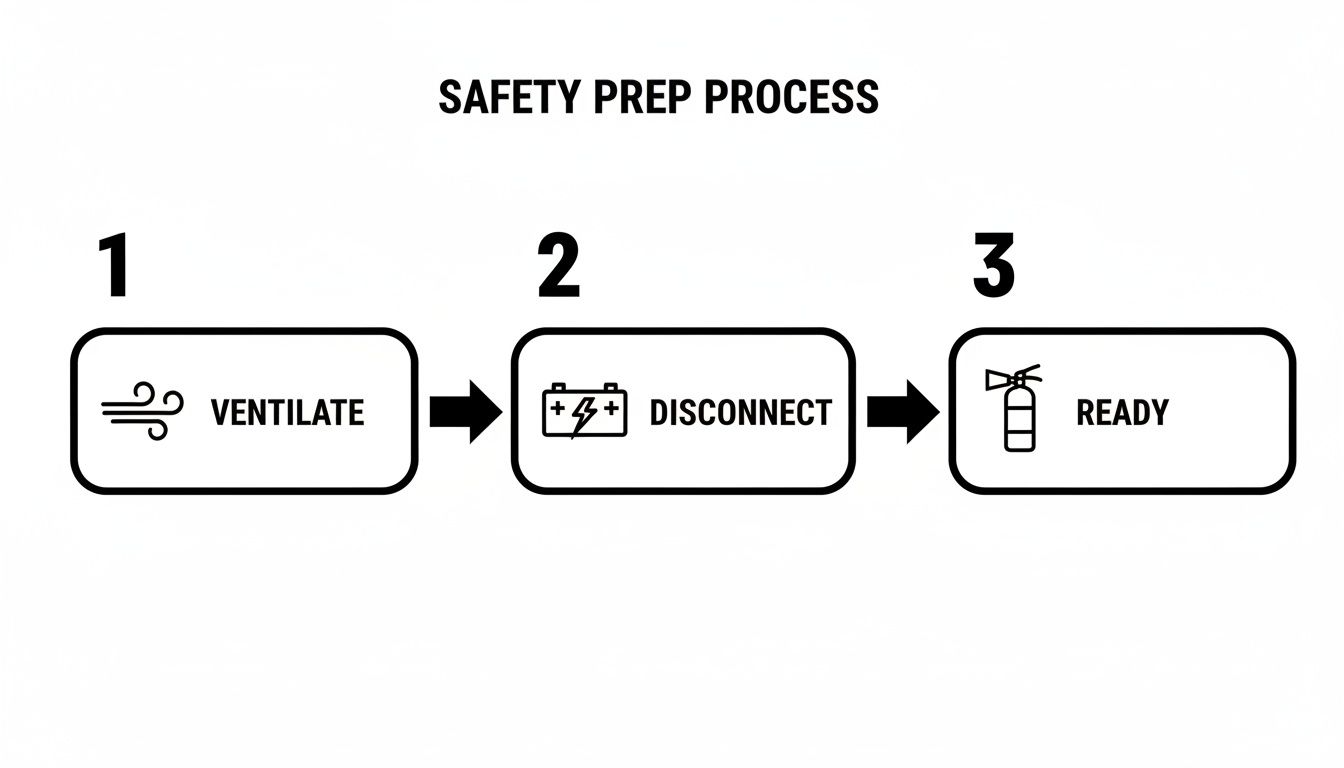
Drilling these three steps—Ventilate, Disconnect, Ready—into your head ensures you've established a safe zone before a single drop of fuel is moved.
Locating and Accessing the Tank
First things first, you need to find the best entry point. Gone are the days when most cars had a handy drain plug at the bottom of the tank. Modern designs seal them up to prevent leaks and damage, which is great for driving but makes our job a bit more involved.
You've really got two ways in:
Siphoning through the filler neck: This is the go-to for many DIYers. You feed a hose down into the tank and pump the fuel out. The big snag? Most modern cars are fitted with anti-siphon valves or mesh screens, which will stop your hose dead in its tracks.
Going in via the fuel pump/sender unit: This is usually the best bet. You’ll typically find the access panel under the back seat or beneath the carpet in the boot. Removing the unit gives you a direct, wide-open view right into the tank.
Your car’s service manual will be your best friend here, showing you exactly where that access panel is. Honestly, this is almost always the most effective way to do a proper, thorough clean-out.
The Draining Process Step-by-Step
Once you've got access, you can start the drain. If you are siphoning, you absolutely need a pump specifically designed for flammable liquids. Never, ever be tempted to start a siphon with your mouth—petrol is highly toxic and incredibly dangerous if ingested.
Get Your Container Ready: Place your approved, sealed fuel container on a flat, stable spot near the car. Make sure it's big enough to hold all the fuel you're draining.
Insert the Hose: Carefully guide the siphon hose into the tank until it touches the bottom. If you're going in through the fuel pump opening, you can see exactly where it's going.
Start Pumping: Begin transferring the fuel. Keep a sharp eye on the container level so you don't overfill it. It’s much safer to use a couple of smaller containers than one huge one that’s too heavy to move.
Get Every Last Drop: Keep going until the tank is completely dry. You may need to jiggle the hose around a bit to suck up the last bits from the corners and crevices.
For a deeper dive into the draining procedure itself, have a look at our guide covering the safe steps and tips for draining a fuel tank.
Critical Warning: Do not, under any circumstances, use a standard wet/dry vac or any other non-certified electric pump. The sparks from the motor can and will ignite fuel vapours with devastating consequences. Only ever use equipment specifically rated for fuel transfer.
Cleaning Out Sludge and Debris
With the fuel gone, you can finally see the state of things inside. Grab a torch (a spark-proof one is ideal) and have a good look. You're looking for a dark, jelly-like sludge, flakes of rust, or any other debris that has settled over time.
Now for the hands-on part.
Wipe It Out: Using lint-free cloths, get in there and wipe out as much of the gunk as you can. A long-reach grabber tool can be a lifesaver for getting to the far corners.
Use a Cleaning Agent: For the really stubborn stuff, you can pour in a small amount of a proper tank cleaning solvent. For a diesel tank, even a bit of fresh diesel can work wonders when swirled around to loosen up the remaining grime. Do not use water. It’ll just cause a world of headaches down the line.
The Final Clear-Out: Use your siphon pump and more clean cloths to get the cleaning agent and all the dislodged debris out. The tank needs to be as clean and dry as you can possibly get it.
Inspecting for Damage
Once it's clean, it’s time for a final, thorough inspection. This is your one chance to spot any underlying problems before you seal everything back up.
Pay close attention to:
Signs of Rust: Look for any pitting or flaky patches, a common issue in older steel tanks. If you see significant corrosion, the tank might need replacing.
Cracks or Leaks: On plastic tanks, check carefully for any hairline cracks or stress marks.
Damaged Components: Have a look at the fuel sender float and any internal baffles to make sure they're intact.
If you find serious rust or any kind of structural damage, stop what you're doing. Repairing a fuel tank is not a DIY job; it's work for a specialist. Your safest bet is to call a professional. A compromised tank isn't just a breakdown waiting to happen—it's a massive safety hazard. At Misfuelled Car Fixer, we can give you an honest assessment and figure out the right way forward to get your vehicle back on the road safely.
How to Legally Dispose of Contaminated Fuel in the UK
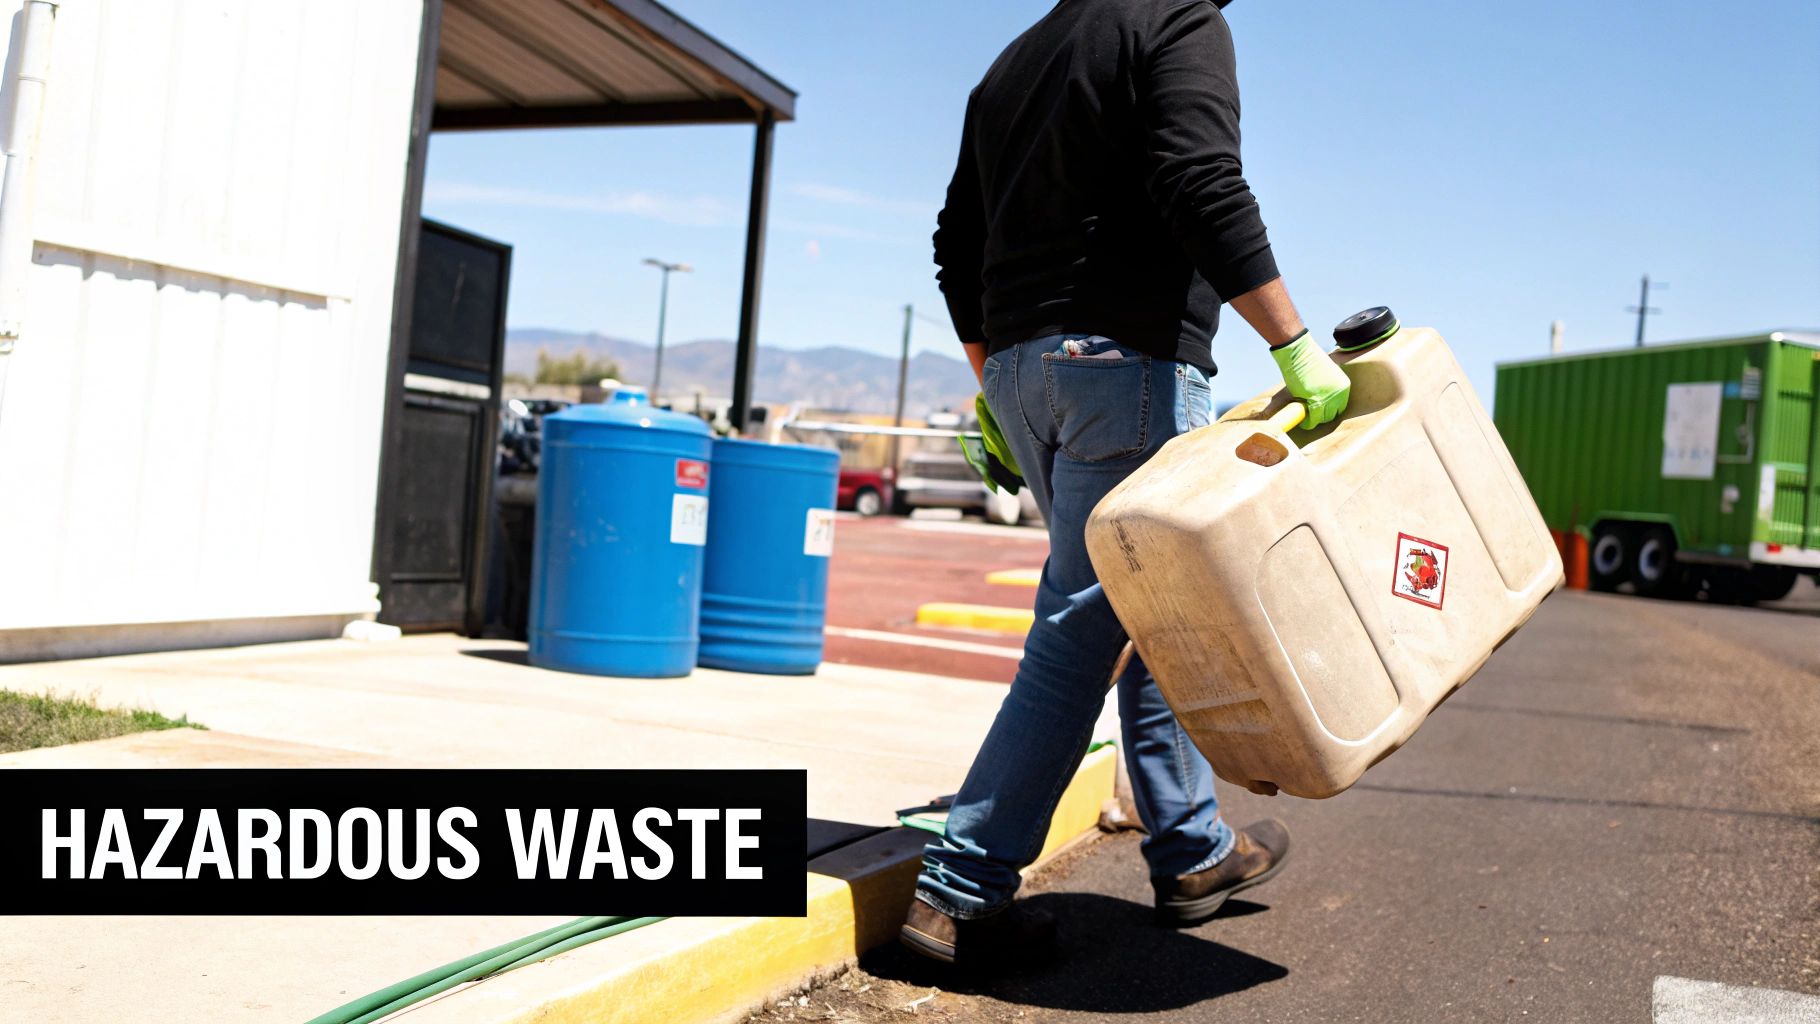
Right, so you've managed to drain all that gunk out of your fuel tank. You might be tempted to think the hard part's over, but what you do next is just as important. That container of old petrol or diesel you're holding isn't just unwanted fuel; it's officially classified as hazardous waste here in the UK.
This means you can't just pour it down the nearest drain or, even worse, leave it beside your wheelie bin for the collection. Handling and disposing of fuel is a serious business, bound by strict legal and environmental rules.
Why You Can’t Just Tip It Away
Under UK law, particularly the Environmental Protection Act 1990, old fuel is a controlled substance for good reason. Tipping it into a public drain can create explosive vapours in the sewer system and cause serious pollution to local rivers and groundwater. It’s incredibly dangerous and comes with hefty penalties.
Don't assume you can just take it to the local tip, either. Most household recycling centres aren't licensed or equipped to take liquid fuel from the public. If you show up with a jerrycan full of contaminated petrol, you'll almost certainly be turned away.
Even the 50–70 litres of contaminated fuel from a single car tank is enough to trigger these hazardous waste controls, requiring licensed handling and disposal.
Finding Your Local Disposal Site
The only correct and legal way to get rid of old fuel is by taking it to a designated local authority hazardous waste disposal site. These are specialised facilities set up to handle materials like fuel, oil, and chemicals safely.
Your first port of call should be your local council's website. A quick search for terms like "hazardous waste disposal," "chemical waste," or "fuel disposal" will usually get you the information you need.
Before you head out, make sure you know the following:
The Right Location: Not every recycling centre accepts hazardous waste. Your council will list the specific sites that do.
Opening Times: These facilities often keep different hours from the main tip, so always check first.
Booking Rules: Some councils now require you to book a slot in advance before you can drop off hazardous items.
Approved Containers: They'll have strict rules. The fuel must be in a sealed, approved container that is clearly labelled. No old milk jugs or flimsy bottles.
When you get there, a member of staff will show you exactly where to go. The process is usually quick, but following their safety rules is non-negotiable. For a more detailed look at this, our guide on how to drain a petrol tank safely and legally in the UK has you covered.
Expert Tip: Never take a chance with fuel disposal. A few minutes spent on your local council's website is all it takes to make sure you're doing things by the book, keeping yourself and the environment safe.
The Professional Advantage: Peace of Mind Included
Honestly, this is where calling in a professional service like Misfuelled Car Fixer really shows its worth. When we come out to sort a fuel drain, we don't just clean the tank—we provide a complete, end-to-end solution.
We would never pump contaminated fuel into a container and just leave it on your driveway for you to deal with. Our technicians are licensed waste carriers, which means we are legally certified to handle the entire disposal process from start to finish.
We take every last drop of the contaminated fuel with us, ensuring it's transported and disposed of correctly at a licensed facility. We then give you a waste transfer note, which is your legal proof that the hazardous material was handled responsibly. This document covers you completely, removing any potential liability and turning a risky, complicated job into one simple, stress-free phone call.
Knowing When to Put the Tools Down
Taking on a fuel tank clean-out yourself is a serious bit of work. It’s not just about the time and elbow grease; you're dealing with flammable liquids and potentially complex vehicle systems. While I'm all for a good DIY job, there are absolutely times when stepping back and calling in a professional is the wisest move you can make.
Knowing your limits isn't a sign of failure—it's what separates a smart car owner from someone who's about to make a very expensive mistake. This is about spotting the red flags that tell you the job is bigger or more dangerous than you first thought.
The Non-Negotiable "Stop" Signs
If you run into any of these situations, it’s time to stop immediately and get an expert on the phone. These aren't just minor roadblocks; they’re serious issues that need specialist tools and know-how.
Here are the clear indicators to call for backup:
You've Found a Fuel Leak: A patch of wet ground under the car or a damp spot on the tank itself changes everything. A leaking fuel tank is a massive fire risk, and trying to patch it up at home is playing with fire, quite literally. A pro needs to diagnose where it’s coming from and whether it can even be safely repaired.
The Inside of the Tank is Badly Rusted: You've drained the tank, you shine a torch inside, and you see a horror show of flaking metal, deep rust pits, and corrosion. This isn't just surface rust; it's a sign the tank's structural integrity is shot. Trying to clean it could easily punch a hole straight through it.
The Wrong Fuel Has Gone Through the Engine: This is a big one. If the engine was started after putting petrol in a diesel (or vice-versa), the contamination is no longer just in the tank. It’s been sucked through the fuel lines, pump, filters, and injectors. The entire system needs a professional flush, not just a simple tank drain.
Your Workspace or Gear Isn't Up to Scratch: Being honest with yourself here is crucial. Working in a poorly ventilated garage, on a slope, or without the right PPE (like a proper vapour respirator and chemical-resistant gloves) is a recipe for disaster. If you can't guarantee your safety, don't even start.
Calling a professional service isn't admitting defeat. It's making a smart, strategic decision to protect your vehicle, your safety, and your bank balance from a much bigger headache.
Weighing Up the Real Cost of a DIY Mistake
It’s easy to get fixated on the cost of a professional call-out, but you have to compare that against the potential cost of a mistake. For anyone who uses their vehicle for work, the maths is even clearer. UK service firms report that a taxi or van off the road for a single day can cost its owner £150–£300 in lost earnings. When you look at it that way, a professional on-site service becomes a manageable business expense, not a crisis. You can see how businesses approach this in recent market reports.
Ultimately, calling a mobile service like Misfuelled Car Fixer turns what could be a dangerous, all-day job into a quick, hassle-free solution. We turn up with all the right gear, take care of the contaminated fuel disposal legally, and can have you safely back on your way, often in under an hour. When the risks start to pile up, it’s simply the smarter call.
Your Fuel Tank Cleaning Questions Answered
Even after walking through the whole process, it's completely normal to still have a few questions rattling around. Let's tackle some of the most common things we get asked by drivers here in the UK.
How Often Should I Actually Clean My Car's Fuel Tank?
Honestly, for most modern cars, this isn't something you put on the annual service schedule. Cleaning a fuel tank is almost always a reaction to a specific problem, not a preventative measure.
You’d only really need to think about it if you've had a mishap, such as:
Putting petrol in your diesel car, or the other way around (it happens!).
Discovering water in the tank, often from a perished seal letting the rain in.
Trying to get a car running that's been parked up for years. Old fuel turns into a nasty, sludgy mess that needs to be removed.
Unless you're running a commercial fleet or restoring a beloved classic, you only need to worry about a tank clean when your car gives you a reason to.
Can I Just Tip a Bottle of Additive in There and Call it a Day?
Fuel additives have their place – they're brilliant for keeping injectors clean and clearing out minor carbon build-up. But when you’re facing serious contamination, they are not a substitute for a full tank drain.
Here’s a good way to think about it: an additive is like using a drain cleaner for a slow-running sink, whereas a full flush is like physically taking the U-bend off to clear a total blockage. If your tank is full of water, the wrong fuel, or a thick layer of sludge, an additive simply won't get it out. In fact, chucking a strong cleaning additive into a really dirty tank can sometimes make things worse by breaking off big chunks of gunk that will immediately clog your fuel filter.
When it comes to major contamination, a complete fuel drain is the only way to be certain you've fixed the problem. Save the additives for routine maintenance.
What Are the Telltale Signs My Fuel Tank Needs Cleaning?
The symptoms almost always circle back to one thing: the engine isn't getting the clean, consistent supply of fuel it needs to run properly. Your car is usually pretty good at telling you something's wrong.
Look out for these classic warning signs:
Engine sputtering and misfiring, especially when you put your foot down to accelerate.
A definite loss of power, making the car feel sluggish and unresponsive.
Trouble starting the engine, whether it's taking longer to catch or just refusing to start.
The engine stalling for no reason, often when you're idling or driving at low speeds.
If you know for a fact you've misfuelled, or you're reviving a long-dormant vehicle, then these symptoms are a dead giveaway that the tank needs sorting out.
Does Cleaning a Plastic Tank Differ From a Metal One?
The basic principle of draining and flushing is pretty much the same for both. The real difference comes down to how you handle any stubborn residue inside. You have to be a lot more gentle with a modern plastic (polyethylene) tank.
Never, ever use anything abrasive like a wire brush or aggressive industrial solvents on a plastic tank. You risk scratching, weakening, or even starting to dissolve the plastic itself. If you've got gunk that won't shift, a soft, lint-free cloth and a very mild detergent (or a specialist cleaner made for plastic) is the way to go. It's worth remembering that the fire and vapour risks are exactly the same for both materials, so all your safety precautions apply equally.
If any of this sounds familiar, or you'd just rather leave it to the professionals, don't risk it. Misfuelled Car Fixer runs a 24/7 mobile service across Suffolk and the surrounding areas. We can sort out any fuel contamination issue and get you safely back on your way. Contact us today for immediate assistance.
Comments